스웨거 개념을 잡느라 상당한 시간을 소요하고 있다. 이전 포스트에서는 기존프로젝트에 스웨거를 적용하는 방법에 대해 정리하였다. 이번에는 노드 익스프레스(Express.js)로 프로젝트를 시작할때 스웨거 툴을 이용해서 개발하는 방법에 대해 알아보겠다.
swaager 커맨드라인 툴 설치
스웨거 모듈(swagger-node)을 글로벌로 설치한다.
$ npm install -g swagger설치가 완료되는 다음 명령어 들을 사용하여 프로젝트를 시작할 수 있다.
swagger project create
swagger project edit
swagger project verify
swagger project start
swagger project test
노드 프로젝트를 생성(create)하고 swagger-edit 도구로 스웨거 문서를 편집(edit)할수 있다. 작성한 스웨거 문서의 문법도 체크(verify)할 수 있다. 생성한 노드 프로젝트를 시작(start)하며 유닛 테스트(test)도 실행한다.
프로젝트 생성
$ swagger project create hello-swagger아래와 같이 폴더 구조가 생성된다.
/hello-swagger
  /api
    /controllers
    /helpers
    /mocks
    /swagger
  /config
  /node_modules
  /test
API 디자인
$ swagger project edit명령어를 실행하면 브라우져가 열리고 swagger-edit 툴을 사용할 수 있다. 이를 이용하여 초기 API를 디자인할 수 있다.
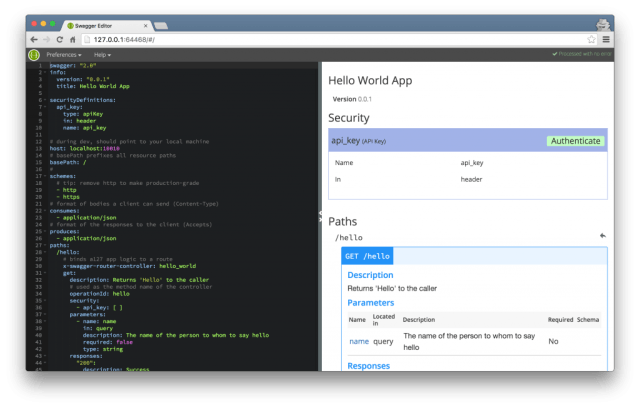
스웨거 문서를 모두 만들었으면 /api/controllers 폴더에서 API 로직을 구현한다. 스웨거 문서와 컨트롤러는 다음과 같이 연결된다.
paths:
  /hello:
    x-swagger-router-controller: hello_world
    get:
      description: Returns 'Hello' to the caller
operationId: hellox-swagger-router-controller키에 할당된 값은 controllers 폴더의 자바스크립트 파일명이다. 그리고 operationId키의 값은 이 파일의 메쏘드 명이다. /api/controllers/hello_world.js 파일을 들여다 보면 쉽게 이해할 수 있다.
module.exports = {
  hello: hello,
}

function hello(req, res) {
  var name = req.swagger.params.name.value || "stranger"
  var hello = util.format("Hello, %s!", name)

  res.json(hello)
}
operationId: hello는 hello() 메소드와 연결된다.
swagger-ui 연동
기본적으로 swagger-ui 툴이 연동되어 있지 않다. node_modules에 설치된 swagger-ui를 추가해 보자.
app.js:
var SwaggerUi = require("swagger-tools/middleware/swagger-ui")

SwaggerExpress.create(config, function (err, swaggerExpress) {
  // add swagger-ui (/docs)
  app.use(SwaggerUi(swaggerExpress.runner.swagger))

  // install middleware
  swaggerExpress.register(app)
})
브라우져로 /docs 경로에 접근하면 swagger-ui를 확인할 수 있다.
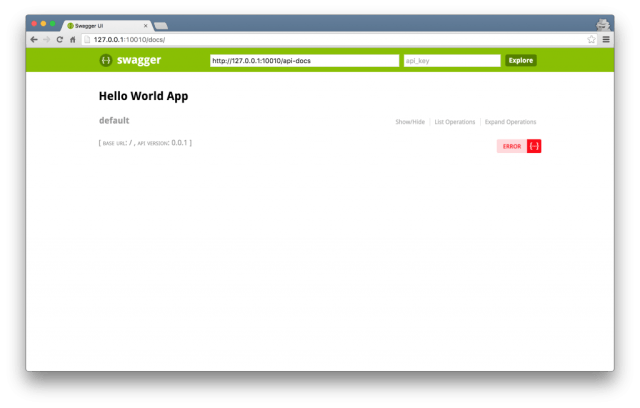
api_key 설정
swagger-ui 우측 상단에는 api_key가 있다. 이 텍스트 필드에 어떤 값을 입력하고 프로토콜을 호출하면 api_key가 url 파라메터로 추가되여 요청된다. API 접근을 위한 보안 설정인 셈이다. 이것도 설정해 보자.
app.js파일에서 SwaggerExpress의 config 객체에 swaggerSecurityHanders 객체를 추가한다.
app.js:
var config = {
  appRoot: __dirname, // required config

  swaggerSecurityHandlers: {
    api_key: function (req, authOrSecDef, scopesOrApiKey, cb) {
      // your security code
      if ("1234" === scopesOrApiKey) {
        cb()
      } else {
        cb(new Error("access denied!"))
      }
    },
  },
}
간단히 api_key를 '1234' 문자열로 설정했다. swagger-edit 툴을 이용해 스웨거 문서에 api_key를 정의하고 설정한다. 만약 각 API별로 설정할 경우에는 해당 프로토콜에 security를 추가하면 된다.
securityDefinitions:
  api_key:
    type: apiKey
    in: query
    name: api_key
security:
  - api_key: []
이제 다시 API를 호출해 보자.
api_key 없이 호출한 경우 에러를 응답한다.

Dynamic host
마지막으로 동적으로 호스트명를 설정해야 할 경우가 있다. 로컬에서 작업할때는 host: localhost:10010로 설정하겠지만 서버에 올라간다면 서버 아이주소로 설정해야할 것이다. swagger-ui 설정 직전에 swaggerExpress 객체를 설정해주면 변경할 수 있다.
app.js:
SwaggerExpress.create(config, function(err, swaggerExpress) {
  if (err) { throw err; }

  // Dynamic swagger host
  swaggerExpress.runner.swagger.host = 'server ip'

  // add swagger-ui (/docs)
  app.use(SwaggerUi(swaggerExpress.runner.swagger));