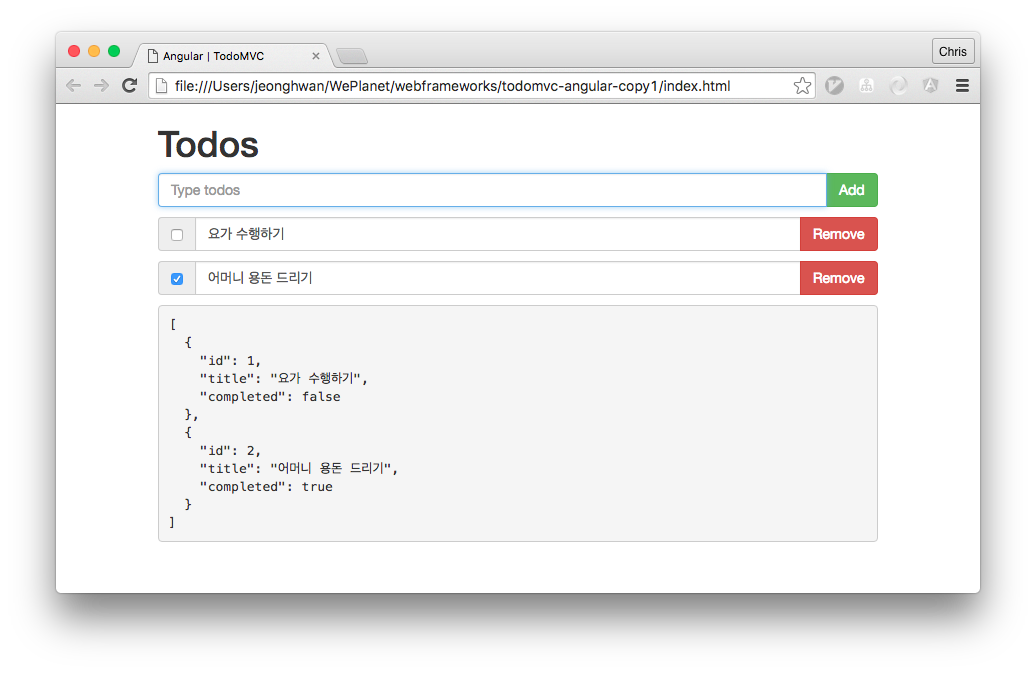
여기서 잠깐. 이왕이면 좀더 이쁘게 만들어 보자. 가장 많이 사용하는 스타일시트 중 트위터 부트스트랩을 이용할 작성이다. 이전 포스트에서 앵귤러 라이브러리를 추가했던 과정이 기억나는가? 그렇다. NPM을 이용해서 라이브러리를 추가 했다.
$ npm instsall bootstrap --save부스스트랩을 우리가 만든 index.html에 추가한다.
index.html:
<link rel="stylesheet" href="node_modules/bootstrap/dist/css/bootstrap.css" />추가만 했어도 기존 화면에 변화가 있을 것이다. 이제 본격적으로 부트스트랩에서 제공하는 스타일시트 클래스를 이용해 보자.
index.html:
{% raw %}
<!DOCTYPE html>
<html lang="en">
  <head>
    <meta charset="UTF-8" />
    <meta
      name="viewport"
      content="width=device-width, initial-scale=1, user-scalable=yes"
    />
    <title>Angular | TodoMVC</title>
    <link
      rel="stylesheet"
      href="node_modules/bootstrap/dist/css/bootstrap.min.css"
    />
  </head>
  <body ng-app="todomvc">
    <div ng-controller="TodomvcCtrl" class="container">
      <h1>Todos</h1>

      <ul class="list-unstyled">
        <li>
          <form ng-submit="addTodo(newTodo)">
            <div class="input-group">
              <input
                type="text"
                ng-model="newTodo"
                class="form-control"
                placeholder="Type todos"
                autofocus
              />
              <span class="input-group-btn">
                <button class="btn btn-success" type="submit">Add</button>
              </span>
            </div>
          </form>
        </li>
      </ul>

      <ul ng-repeat="todo in todos" class="list-unstyled">
        <li class="todo-item">
          <div class="input-group">
            <span class="input-group-addon">
              <input
                type="checkbox"
                aria-label="..."
                ng-model="todo.completed"
              />
            </span>
            <input
              type="text"
              class="form-control"
              aria-label="..."
              ng-model="todo.title"
            />
            <div class="input-group-btn">
              <button class="btn btn-danger" ng-click="remove(todo.id)">
                Remove
              </button>
            </div>
          </div>
        </li>
      </ul>

      <pre>{{todos | json}}</pre>
    </div>

    <script src="node_modules/angular/angular.js"></script>
    <script src="js/app.js"></script>
    <script src="js/controllers/TodomvcCtrl.js"></script>
  </body>
</html>
{% endraw %}
결과를 확인해보자. 훨씬 깔끔해 졌다.
