작년까지만 하더라도 리엑트보다는 앵귤러가 더 인기였던것 같았다. 그래서 Angular, Nodejs, Express, MongoDB 조합의 MEAN 스택에 대한 인기가 상당했고 이를 구현하는 방법도 다양했다. 이러한 프레임웍과 라이브러리를 조합하여 프로젝트를 시작할 수 있게 구성된 코드를 스캐폴딩이라고 한다. 요맨(Yeoman)은 스캐폴딩을 자동으로 만들어주는 툴을 제공하는데 이것을 제너레이터라고 한다.
요맨에서 제공되는 제너레이터 중 주로 Angular-fullstack을 이용해 웹 어플리케이션 개발했다. 제너레이터가 만들어주는 코드를 사용할 뿐만아니라 그 코드를 분석하면서 배울 수 있는 점이 적지 않았던 것 같다. 일부는 내가 주로 사용하는 구조로 변경해서 사용하기도 했었고 나중에는 나만의 제너레이터를 만들어 사용하면 좋겠다고 생각했다.
요맨 사이트에 가보면 다양한 제너레이터를 사용할수 있는 것은 물론 제너레이터를 만들고 배포할수 있는 방법도 제공한다. 상세히 설명하기는 하지만 따라하다보면 썩 쉬운 방법은 아닌것 같았다.
generator-generator
그래서 제너레이터를 만들기 위한 제너레이터가 있다. 재귀적 표현이다. 이것을 이용하면 제너레이터를 만들기 위한 기본코드를 생성하는데 도움을 얻을 수 있다.
generator-generator 모듈을 npm으로 설치한다.
npm install -g generator-generator폴더를 하나 만들고 설치한 제너레이터로 내가 만들 weplajs 제너레이터를 만들어 봤다. 제너레이터는 앞에 "generator-" 접두사를 붙여야한다. generator-weplajs 폴더를 만들고 그 안에서 설치한 제너레이터를 실행한다.
mkdir generator-weplajs && cd generator-weplajs
yo generator
몇 가지 질문에 대답하고나면 기본 코드가 자동으로 만들어진다.
➜  generator-weplajs yo generator
? Your generator name generator-weplajs
? Description
? Project homepage url
? Author's Name jeonghwan-kim
? Author's Email ej88ej@gmail.com
? Author's Homepage
? Package keywords (comma to split)
? Send coverage reports to coveralls Yes
? GitHub username or organization jeonghwan-kim
? Which license do you want to use? Apache 2.0
   create package.json
   create README.md
   create .editorconfig
   create .gitattributes
   create .gitignore
   create generators/app/index.js
   create generators/app/templates/dummyfile.txt
   create test/app.js
   create .travis.yml
   create gulpfile.js
   create LICENSE
생성된 파일중 몇 개만 살펴보면 우선 package.json 파일이다. 만든 제너레이터 코드가 npm 저장소에 배포될때 npmjs.com은 이 파일을 참고하게 되는데 요맨 공식문서에는 다음과 같이 하기를 권장한다.
- name은 generator-your-unique-name 으로 작성할 것
- keyword 배열에 "yeoman-generator" 문자열을 추가할 것
- author 키에 name, link 키워드를 추가할 것
- repository에 깃헙 링크를 추가할 것
generator-generator를 사용하면 기본적으로 위 필드들이 자동으로 생성된다. 빈 문자열로 된 부분에 적당한 정보를 입력하면 된다.
생성된 폴더중에 generator 폴더가 실제로 코드를 생성하는 역할을 하는 부분이다. generator/app/index.js를 보면 사용자 입력를 받는 부분과 파일을 생성하는 부분 그리고 npm 패키지를 설치하는 부분으로 구성되어 있다.
"use strict"
var yeoman = require("yeoman-generator")
var chalk = require("chalk")
var yosay = require("yosay")

module.exports = yeoman.Base.extend({
  prompting: function () {
    // Have Yeoman greet the user.
    this.log(
      yosay(
        "Welcome to the super-duper " +
          chalk.red("generator-weplajs") +
          " generator!"
      )
    )

    var prompts = [
      {
        type: "confirm",
        name: "someAnswer",
        message: "Would you like to enable this option?",
        default: true,
      },
    ]

    return this.prompt(prompts).then(
      function (props) {
        // To access props later use this.props.someAnswer;
        this.props = props
      }.bind(this)
    )
  },

  writing: function () {
    this.fs.copy(
      this.templatePath("dummyfile.txt"),
      this.destinationPath("dummyfile.txt")
    )
  },

  install: function () {
    this.installDependencies()
  },
})
제너레이터는 기본적으로 yeoman.Base.extend() 메소드를 이용해 설정한다.
사용자의 입력을 받는 부분이 prompting에 설정한 코드다. type: 'confirm'은 사용자에게 yes/no 의 답변을 얻기위한 질문을 하는 것이고 name은 사용자가 입력한 정보가 담기는 변수 이름이다.message는 사용자에게 물어볼 질문이고 마지막으로 default는 답변에 대한 기본값이다.
writing에서는 템플릿 파일을 이용해 코드를 생성해 내는 부분이다. prompting에서 사용자입력을 this.props에 저장했기 때문에 여기서도 사용자 입력 값을 활용할수 있지만 지금 코드에는 그런 부분은 없다. 단순히 dummyfile.txt를 그대로 복사하는 일만 한다.
마지막으로 install에서는 제너레이터로 생성된 프로젝트에 필요한 모듈을 설치하는 부분이다. 생성된 파일 중 package.json과 bower.json이 있는 경우 this.installDependencies() 함수를 실행하면 npm install && bower install 이 자동으로 실행된다. 각각 별도로 실행하고 싶을 때는 this.npmInstall(), this.bowerInstall()을 사용하면 된다. (action/install 참고)
템플릿 이용하기
generator-weplajs에서 원하는 제너레이터의 기능은 두 가지다.
- ExpressJS, Sequelize, MySQL로 구성된 API 서버 코드를 생성
- 리소스 이름을 입력하여 CRUD API를 위한 코드를 생성
ExpressJS, Sequelize, MySQL로 구성된 API 서버 코드를 생성
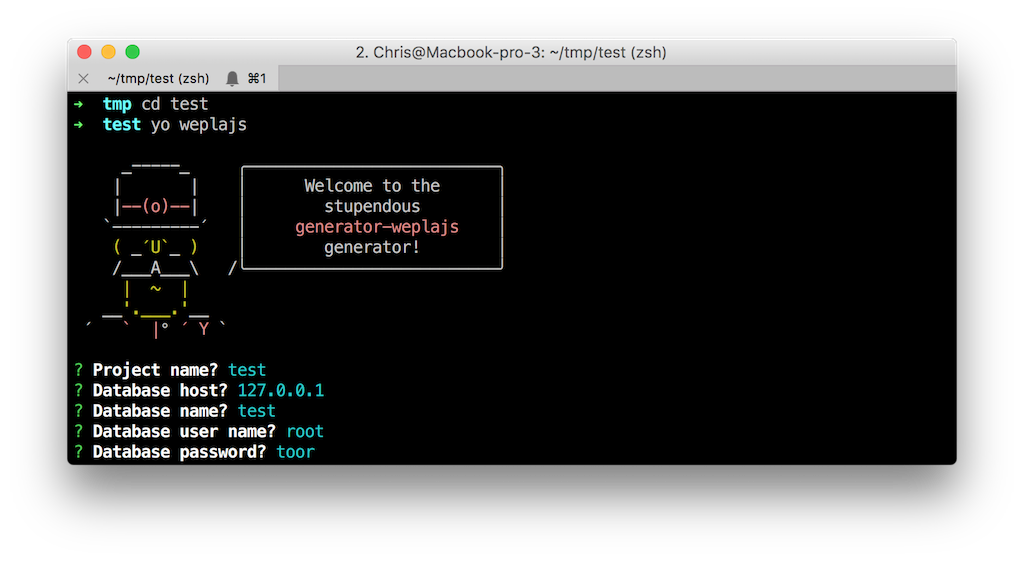
사용자에게 입력받을 데이터는 디비 호스트, 이름, 계정정보다. generator/app/index.js의 prompting 부분에 질문할 내용을 컬렉션 형식으로 추가했다.
prompting: function () {
  // Have Yeoman greet the user.
  this.log(yosay(
    'Welcome to the stupendous ' + chalk.red('generator-weplajs') + ' generator!'
  ));

  var prompts = [{
    type: 'input',
    name: 'name',
    message: 'Project name?',
    // Defaults to the project's folder name if the input is skipped
    default: this.appname
  }, {
    type: 'input',
    name: 'dbHost',
    message: 'Database host?',
    default: '127.0.0.1'
  }, {
    type: 'input',
    name: 'dbName',
    message: 'Database name?',
    default: this.appname
  }, {
    type: 'input',
    name: 'dbUser',
    message: 'Database user name?',
    default: 'root'
  }, {
    type: 'input',
    name: 'dbPass',
    message: 'Database password?',
    default: 'toor'
  }];

  return this.prompt(prompts).then(function (props) {
    // To access props later use this.props.someAnswer;
    this.props = props;
  }.bind(this));
}
입력한 정보는 this.props 를 통해서 접근이 가능하기때문에 writting 부분에서 이 정보를 이용해서 템플릿에 추가할 수 있다.
writing: function () {
  this.fs.copyTpl(
      this.templatePath('app'),
      this.destinationPath('app'), {
        name: this.props.name,
        dbName: this.props.dbName,
        dbUser: this.props.dbUser,
        dbPass: this.props.dbPass,
        dbHost: this.props.dbHost
      });

  this.fs.copy(
      this.templatePath('bin'),
      this.destinationPath('bin'));

  this.fs.copyTpl(
      this.templatePath('package.json'),
      this.destinationPath('package.json'), {
        name: this.props.name
      });

  this.fs.copyTpl(
      this.templatePath('README.md'),
      this.destinationPath('README.md'), {
        name: this.props.name
      });
}
파일을 복사하기위해서 두 가지 함수를 사용한다. this.fs.copy()는 단순히 파일을 복사하는 기능이고 this.fs.copyTpl() 은 파일을 복사하면서 파일 내용을 수정할 수 있다. fs.copyTpl(origin, target, data) 함수에 첫번째 파라매터가 복사할 원본 파일 즉 템플릿 파일이나 템플릿 파일을 포함한 폴더이고 두 번째가 생성될 타겟 경로명이다. 마지막 data가 템플릿에 넣을 데이터인데 템플릿 파일에서 "<%= name =>" 문자열을 찾아 data.name 값으로 대채하는 방식이다.
리소스 이름을 입력하면 CRUD API가 자동으로 생성됨
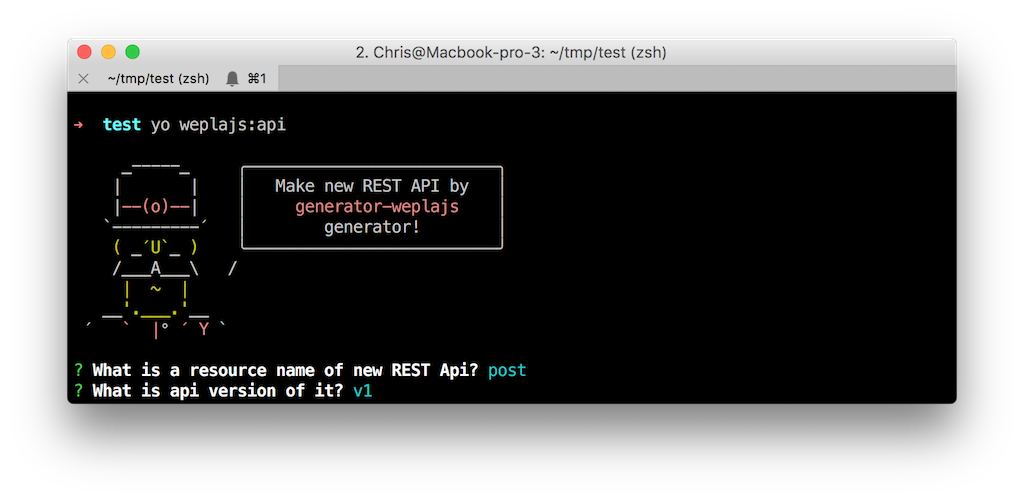
지금까지는 yo weplajs 명령어를 통해 초기 파일들을 자동으로 생성하는 제너레이터를 만들었다. 이번에 만들 기능은 제너레이터를 이용해 이미 생성된 폴더 내에서 yo weplajs:api 로 생성되는 기능인데 이것을 서브 제너레이터라고 부른다. 서브 제너레이터를 만들기 위해서는 generator-generator의 도움을 받을 수 있다.
yo generator:subgenerator api기존 폴더에서 /generator/api 폴더가 추가 되었다. api라는 이름의 서브 제너레이터는 /generator/api/index.js 파일에서 설정할 수 있다. 우선 사용자에게 api의 리소스 이름을 입력받기 위해 prompting 부분을 추가했다.
prompting: function () {
  // Have Yeoman greet the user.
  this.log(yosay(
      'Make new REST API by ' + chalk.red('generator-weplajs') + ' generator!'
  ));

  var prompts = [{
    type: 'input',
    name: 'resource',
    message: 'What is a resource name of new REST Api?',
    default: 'resource'
  }, {
    type: 'input',
    name: 'version',
    message: 'What is api version of it?',
    default: 'v1'
  }];

  return this.prompt(prompts).then(function (props) {
    // To access props later use this.props.someAnswer;
    this.props = props;
  }.bind(this));
}
리소스 이름과 버전 정보를 받아서 resource, version 변수에 저장했다.
이 다음이 좀 복잡하다. 입력받은 정보를 기반으로 기존의 /api/resource 폴더를 만들면 된다. 동일하게 lib/Resource.js, models/Resource.js 파일을 만드는 것은 쉽다. 하지만 routes.js 파일에서 라우팅 설정 코드를 추가하는 것은 직접 구현해야 하는 부분이다. 공식 사이트에서는 파일을 파싱해서 AST(Abstact Syntax Tree)를 만들어서 처리하는 방법을 말하는데...... 이렇게 까지 하고 싶지는 않다. generator-angular-fullstack의 서브제너레이터 코드에서 기존 파일의 특정 주석 위치를 찾아 그곳에 내용을 추가하는 부분을 발견했다.
prompting에 리소스 명을 입력받기 위한 데이터를 컬렉션에 추가했다. 이 코드를 참고해서 util.js 파일을 만들었다.
"use strict"

const fs = require("fs")

const rewrite = args => {
  let lines = args.haystack.split("\n")

  let otherwiseLineIndex = -1
  lines.forEach((line, i) => {
    console.log("line:", line)

    if (line.indexOf(args.needle) !== -1) {
      otherwiseLineIndex = i
    }
  })
  if (otherwiseLineIndex === -1) return lines.join("\n")

  let spaces = 0
  while (lines[otherwiseLineIndex].charAt(spaces) === " ") {
    spaces += 1
  }

  let spaceStr = ""
  while ((spaces -= 1) >= 0) {
    spaceStr += " "
  }

  lines.splice(
    otherwiseLineIndex + 1,
    0,
    args.splicable
      .map(function (line) {
        return spaceStr + line
      })
      .join("\n")
  )

  return lines.join("\n")
}

exports.rewrite = args => {
  args.haystack = fs.readFileSync(args.file, "utf8")
  const body = rewrite(args)

  fs.writeFileSync(args.file, body)
}
/generator/api/index.js의 end 부분에서 rewrite() 함수를 이용해서 기존의 routes.js 파일을 수정할 수 있었다.
end: function () {
  require('../util').rewrite({
    file: 'app/routes.js',
    needle: '// Insert routes below',
    splicable: [
      `app.use('/v1/${this.props.resource}s', require('./api/v1/${this.props.resource}'));`
    ]
  });
}
테스트
test 폴더가 제너레이터에 대한 테스트 코드이고 npm test 를 통해 테스트를 실행할 수 있다. 하지만 여기서 테스트 코드는 다루지 않겠다. 다만 npm 배포전 로컬환경에서 테스트로 한 번 사용해 보는 방법을 알아봤다. npm link 명령어를 사용하면 npm 저장소에 배포하지 않고 로컬환경에만 generator-weplajs 모듈을 설치할 수 있다.
npm link이제 테스트 폴더를 하나 만들어서 yo weplajs 명령어를 사용할 수 있다.
yo weplajs
서브 제너레이터도를 이용해 api를 추가할수 있다.
yo weplajs:api
배포하기
배포는 npm 프로젝트 배포하는 것과 동일하다.
npm publish이렇게 해서 만든 제너레이터가 generator-weplajs 이다. expressjs, sequelize, mysql로 구성된 api 서버 프로젝트를 만들 수 있고 서브 제너레이터를 이용해 리소스 이름으로 api를 추가 할 수도 있다. 인증과 AWS 연동도 점차 추가할 예정이다.